In Part 2, we hired the bouncer. We built a system where users can exchange their credentials for a JWT Access Token, granting them entry to protected routes.
But we have a major user experience problem.
For security reasons, we set our Access Token to expire in 15 minutes. This means that every 15 minutes, your user gets kicked out and has to log in again. Imagine if Netflix made you type your password every time an episode ended. You would cancel your subscription immediately.
The Dilemma:
- Short tokens are secure (if stolen, they are useless quickly).
- Long tokens are convenient (users stay logged in) but dangerous (if stolen, the hacker has access forever).
How do we get the security of a short token with the convenience of a long session?
Welcome to Part 3 of our Authentication Series. Today, we implement Refresh Tokens—the secret handshake that keeps your users logged in securely for days, weeks, or months.
The Strategy: The Hotel Key Card
Think of your authentication system like a hotel:
- The Access Token (Room Key): It opens your door. It’s lightweight, disposable, and expires quickly. If you lose it, the hotel just gives you a new one, and the old one stops working.
- The Refresh Token (ID/Reservation): This is stored safely in the hotel database. You use this to get a new Room Key.
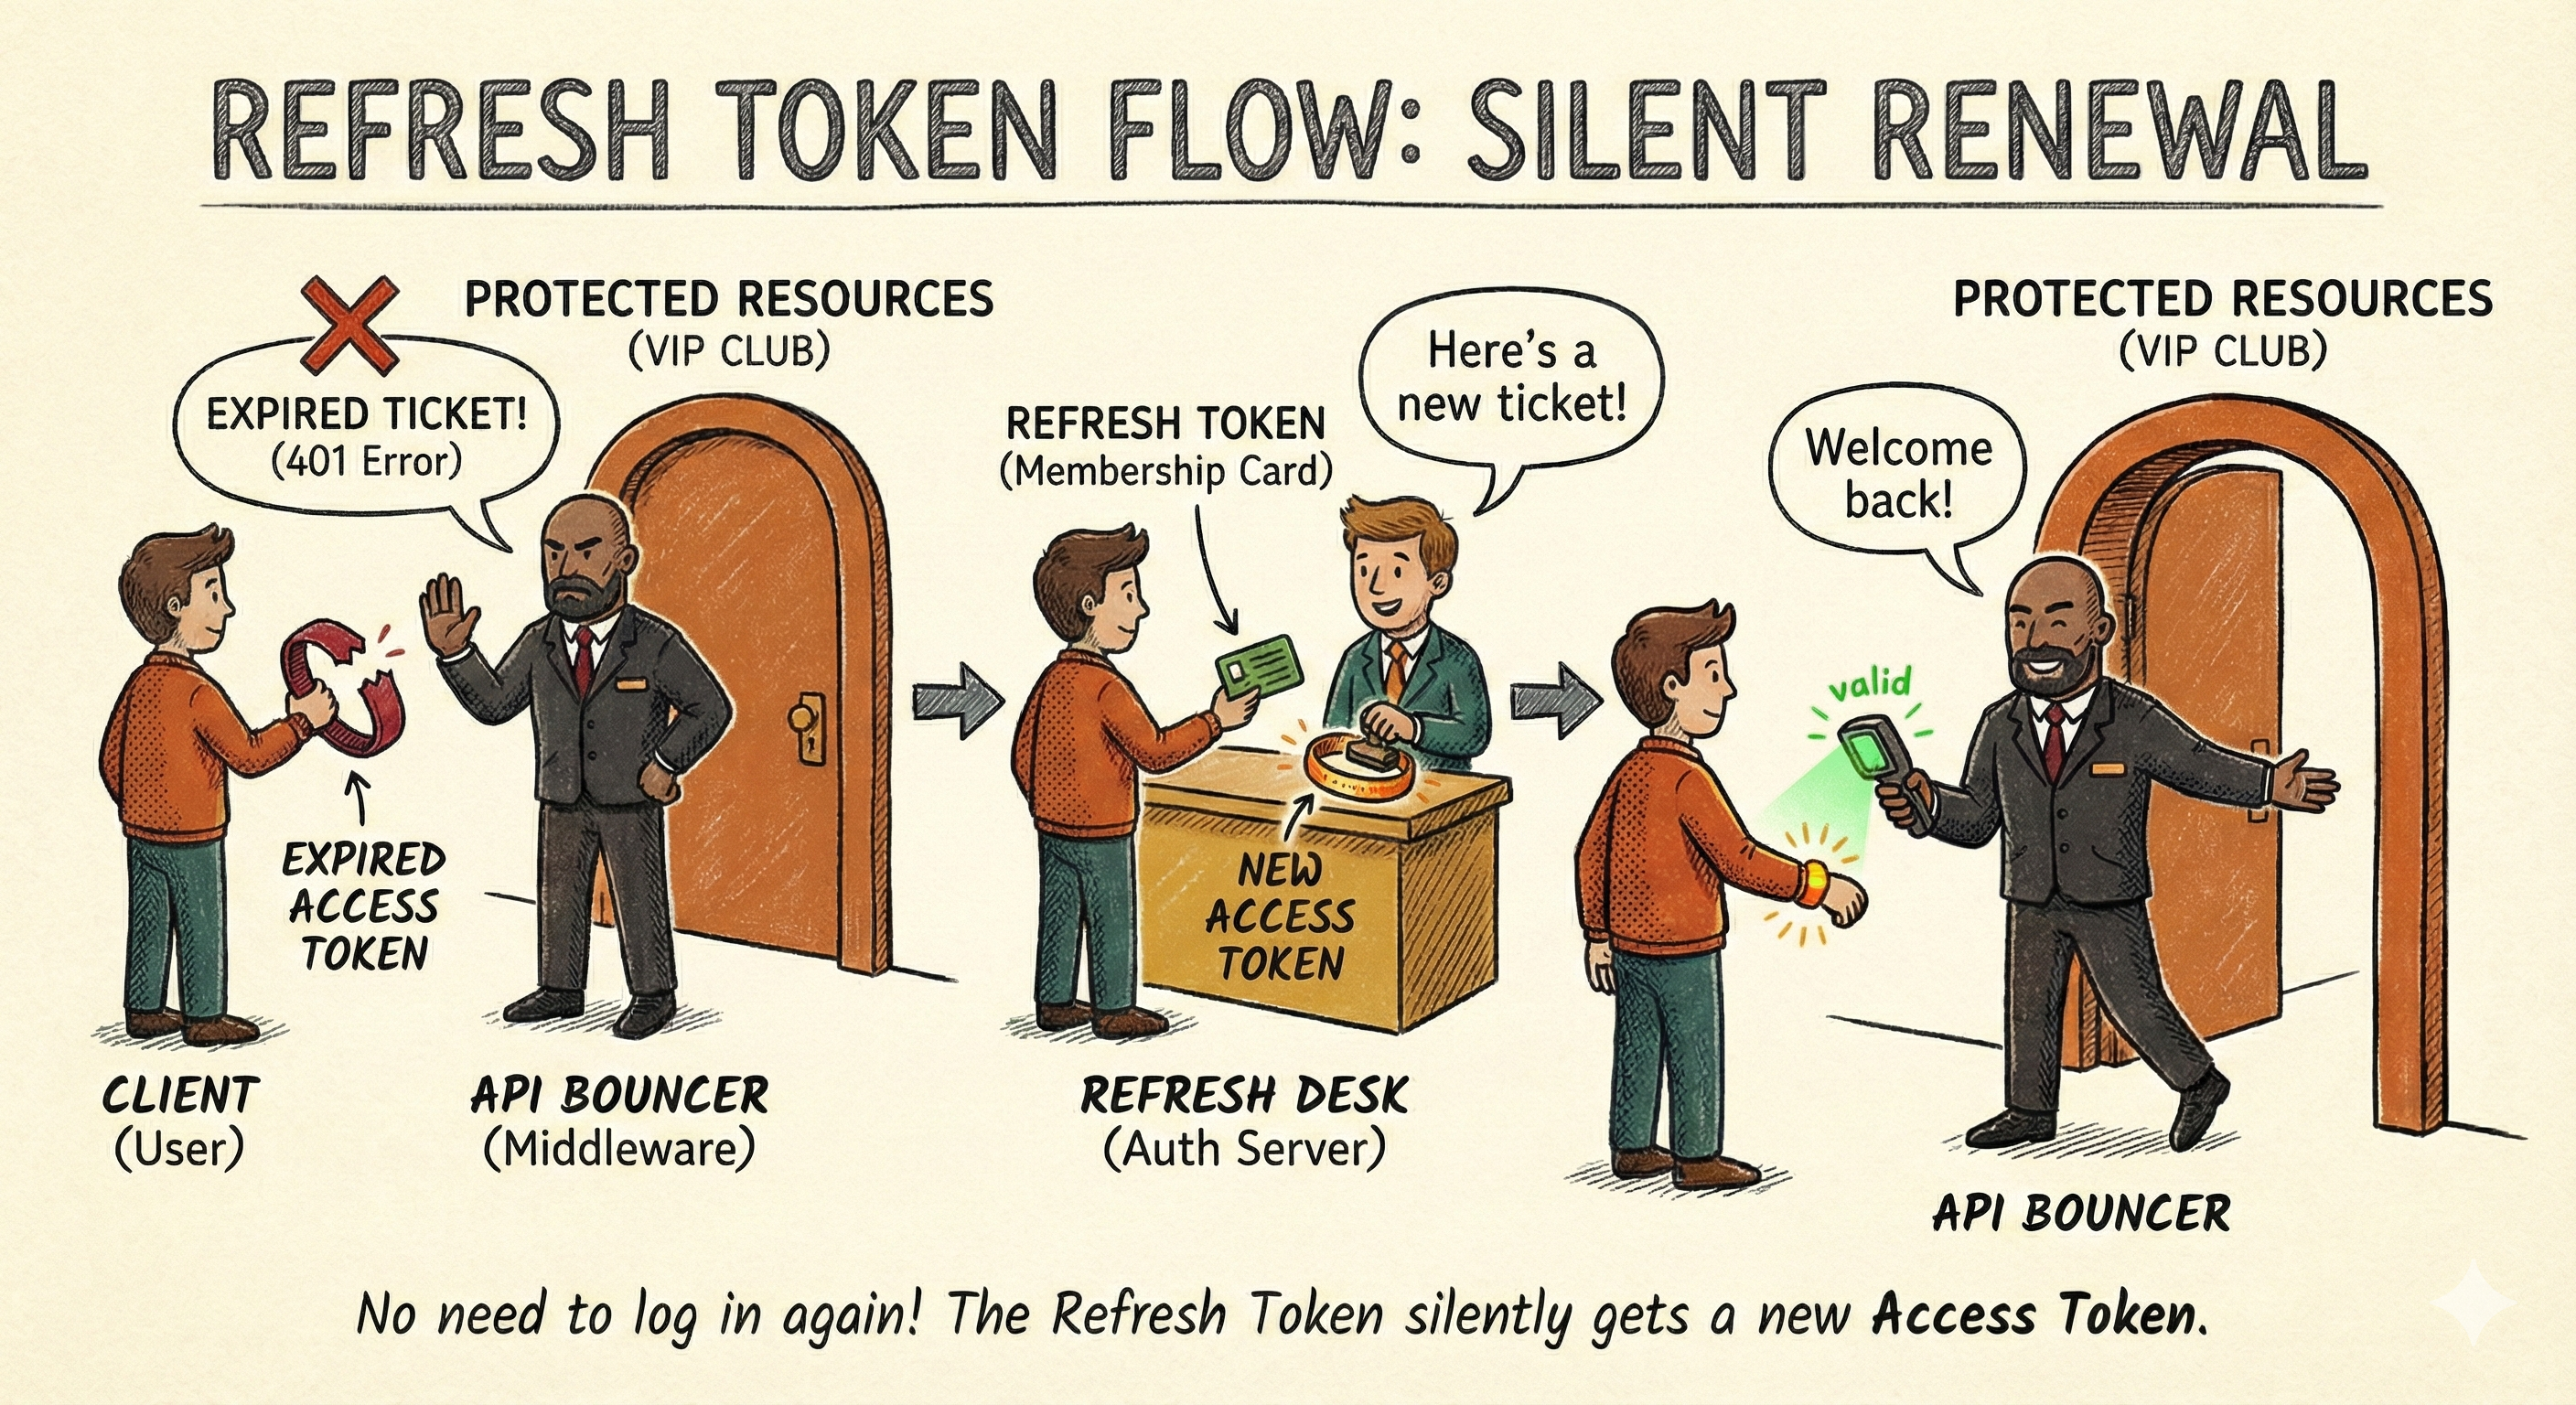
In our app, the flow looks like this:
- Login: User gets an Access Token (15 min) and a Refresh Token (7 days).
- Browsing: User uses the Access Token to hit API endpoints.
- Expiry: After 15 mins, the Access Token dies. The API returns
401 Unauthorized. - Silent Renewal: The frontend sends the Refresh Token to a special endpoint. The server verifies it against the database and issues a new Access Token.
- Result: The user never notices a thing.
Let's build it.
Step 1: Updating the User Model
Unlike Access Tokens, which are stateless (only the user has them), Refresh Tokens must be stored in the database.
Why? Because if a user's device is stolen, we need the ability to revoke their access by deleting the refresh token from our DB.
Update: src/models/user.model.js
We need to add a field to store these tokens and methods to generate them.
import mongoose from 'mongoose';
import jwt from 'jsonwebtoken';
import bcrypt from 'bcryptjs';

const userSchema = new mongoose.Schema({
    // ... existing name, email, password fields ...

    // New field: Store multiple refresh tokens (for multi-device login)
    refreshTokens: [
        {
            token: { type: String, required: true },
            createdAt: { type: Date, default: Date.now }
        }
    ]
}, { timestamps: true });

// ... existing pre-save hook and comparePassword method ...

userSchema.methods.generateAuthToken = function() {
    // Short lived (15m)
    return jwt.sign(
        {
            userId: this._id,
            email: this.email
        },
        process.env.JWT_SECRET,
        { expiresIn: process.env.JWT_EXPIRY || '15m' }
    );
}

// Generate long-lived Refresh Token
userSchema.methods.generateRefreshToken = function() {
    return jwt.sign(
        { userId: this._id },
        process.env.REFRESH_SECRET,
        { expiresIn: process.env.REFRESH_EXPIRY || '7d' }
    );
};

const User = mongoose.model('User', userSchema);
export default User;
🔐 Security Critical: Two Secrets
Never sign your Refresh Tokens with the same secret key as your Access Tokens. If one key is compromised, your entire security layer falls.
Update your .env file immediately:
# ... existing vars
JWT_SECRET=your_access_token_secret
JWT_EXPIRY=15m

REFRESH_SECRET=your_completely_different_refresh_secret
REFRESH_EXPIRY=7d
MAX_REFRESH_TOKENS=5
Step 2: The Secure Cookie Strategy
Where do we store the Refresh Token on the client?
- LocalStorage? ❌ No. Any malicious JavaScript (XSS attack) can read it and steal your session.
- HttpOnly Cookie? ✅ Yes. JavaScript cannot read these cookies. They are sent automatically by the browser with every request.
We need a library to parse these cookies.
npm install cookie-parserUpdate: src/app.js
Register the middleware.
import cookieParser from 'cookie-parser';
// ... other imports

const app = express();

app.use(express.json());
app.use(cookieParser()); // <--- Add this

// ... routes
Step 3: Upgrading the Login Controller
We need to modify our login function to issue both tokens, save the refresh token to the DB, and send it in a cookie. We'll also implement token limiting to prevent unlimited device logins.
A helper function trimRefreshTokens() removes old tokens when the limit (controlled by MAX_REFRESH_TOKENS env variable) is exceeded:
// Helper function to keep refresh tokens under the limit
const trimRefreshTokens = (user) => {
    const max = Number(process.env.MAX_REFRESH_TOKENS) || 5;
    if (max <= 0 || user.refreshTokens.length <= max) {
        return;
    }

    user.refreshTokens = user.refreshTokens
        .sort((a, b) => new Date(a.createdAt) - new Date(b.createdAt))
        .slice(-max);
};
Update: src/controllers/user.controller.js
export const loginUser = asyncHandler(async (req, res) => {
    const { email, password } = req.body;

    // ... validation logic ...

    const user = await User.findOne({ email });
    if (!user || !(await user.comparePassword(password))) {
        throw new ApiError(401, "Invalid Credentials");
    }

    // 1. Generate Tokens
    const accessToken = user.generateAuthToken();
    const refreshToken = user.generateRefreshToken();

    // 2. Save Refresh Token to DB
    user.refreshTokens.push({ token: refreshToken });
    trimRefreshTokens(user); // Remove old tokens if limit exceeded
    await user.save();

    // 3. Set Refresh Token in HttpOnly Cookie
    const options = {
        httpOnly: true,      // JS cannot read this
        secure: process.env.NODE_ENV === 'production', // HTTPS only in prod
        sameSite: 'strict',  // CSRF protection
        maxAge: 7 * 24 * 60 * 60 * 1000, // 7 days
        path: '/'
    };

    // Exclude password from response
    const userResponse = user.toObject();
    delete userResponse.password;

    return res.status(200)
        .cookie("refreshToken", refreshToken, options)
        .json(
            new ApiResponse(
                200,
                { user: userResponse, accessToken },
                "Logged In Successfully"
            )
        );
});
What Changed?
- Generate Two Tokens: Both access and refresh tokens
- Save to Database: Store refresh token in user's
refreshTokensarray - Token Limiting: Use
trimRefreshTokens()to maintain max active sessions - HTTP-Only Cookie: Send refresh token in a secure cookie (not in JSON response)
- Security Flags:
httpOnly: Prevents XSS attacks (JavaScript can't read it)secure: HTTPS only in productionsameSite: Prevents CSRF attacksmaxAge: Cookie expires in 7 dayspath: Ensures cookie is sent with all paths
- Exclude Password: Always remove sensitive fields before responding
Note: For stronger security, avoid storing refresh tokens in plain text. Hash each refresh token before saving it, then hash the incoming token on refresh and compare the hashes.
Step 4: The Renewal (Refresh Endpoint)
This is the most critical part of the logic. When the user's access token expires, they will hit this endpoint to get a new one.
Important: This implementation uses token rotation—we retire the old refresh token and issue a new one. This prevents token reuse attacks.
Add to src/controllers/user.controller.js:
export const refreshAccessToken = asyncHandler(async (req, res) => {
    // This middleware (refreshAuthenticate) provides us with:
    // - req.refreshToken: the incoming refresh token from the cookie
    // - req.userDoc: the user document from the database
    const incomingRefreshToken = req.refreshToken;

    if (!incomingRefreshToken) {
        throw new ApiError(401, "Refresh token missing. Login again.");
    }

    // Use user doc attached by middleware
    const user = req.userDoc;
    if (!user) {
        throw new ApiError(401, "Invalid refresh token");
    }

    // 1. Remove the old refresh token (token rotation)
    user.refreshTokens = user.refreshTokens.filter(t => t.token !== incomingRefreshToken);

    // 2. Generate NEW refresh token
    const newRefreshToken = user.generateRefreshToken();
    user.refreshTokens.push({ token: newRefreshToken });
    trimRefreshTokens(user); // Keep under MAX_REFRESH_TOKENS limit
    await user.save();

    // 3. Generate NEW access token
    const accessToken = user.generateAuthToken();

    // 4. Set NEW refresh token in cookie
    const options = {
        httpOnly: true,
        secure: process.env.NODE_ENV === 'production',
        sameSite: 'strict',
        maxAge: 7 * 24 * 60 * 60 * 1000,
        path: '/'
    };

    res.cookie('refreshToken', newRefreshToken, options);
    return res.status(200).json(
        new ApiResponse(200, { accessToken }, "Access token generated")
    );
});
What's Happening Here?
- Token Rotation: Remove the old refresh token and issue a new one. This is a security best practice.
- Verify Token: The
refreshAuthenticatemiddleware has already verified the token signature and checked if it exists in the database. - Database Validation: By checking if the token exists in the user's
refreshTokensarray, we know it hasn't been revoked. - Issue New Tokens: Generate fresh access and refresh tokens.
- Security: Token rotation means if a refresh token is stolen and used, the legitimate user's token becomes invalid on the next refresh, alerting them to the breach.
💡 Token Rotation Benefit: If an attacker steals and uses a refresh token, the legitimate user's copy becomes invalid. When they try to refresh next, they're rejected and can log in with fresh credentials. This minimizes damage from token theft.
Step 5: The Logout (Revocation)
Logging out isn't just deleting the cookie on the client. We must remove the refresh token from the database to prevent it from ever being used again.
Add to src/controllers/user.controller.js:
export const logoutUser = asyncHandler(async (req, res) => {
    // Access token is validated by authenticate middleware
    const incomingRefreshToken = req.cookies?.refreshToken;
    let user = null;

    if (req.user?.userId) {
        user = await User.findById(req.user.userId);
    }

    // Remove this specific token from the DB (if present)
    if (user && incomingRefreshToken) {
        user.refreshTokens = user.refreshTokens.filter(t => t.token !== incomingRefreshToken);
        await user.save();
    }

    const options = {
        httpOnly: true,
        secure: process.env.NODE_ENV === 'production',
        sameSite: 'strict',
        path: '/'
    };

    res.clearCookie('refreshToken', options);
    return res.status(200).json(
        new ApiResponse(200, null, "Logout successful")
    );
});
What's Happening Here?
- Extract Token: Read the refresh token from the cookie.
- Identify User: Use the access token (from
authenticate) to load the user. - Remove from DB: Delete the specific token from the user's
refreshTokensarray. - Clear Cookie: Remove the refresh token cookie from the client.
- Result: The token can never be used again, even if it hasn't expired.
Step 6: Wiring the Routes and Middleware
Let's expose these endpoints with proper middleware.
First, Update the Auth Middleware: src/middlewares/auth.middleware.js
We need two middleware functions:
authenticate- Verifies Access TokensrefreshAuthenticate- Verifies Refresh Tokens and attaches the user document
import jwt from 'jsonwebtoken';
import { ApiError } from '../utils/ApiError.js';
import { asyncHandler } from '../utils/asyncHandler.js';
import User from '../models/user.model.js';

// Middleware to verify Access Token
export const authenticate = asyncHandler(async (req, res, next) => {
    // Get token from Authorization header
    const authHeader = req.headers.authorization;

    if (!authHeader || !authHeader.startsWith('Bearer ')) {
        throw new ApiError(401, 'Access denied. No token provided.');
    }

    // Extract token (format: "Bearer <token>")
    const token = authHeader.split(' ')[1];

    try {
        // Verify token using access token secret
        const decoded = jwt.verify(token, process.env.JWT_SECRET);

        // Attach user info to request object
        req.user = decoded;

        next();
    } catch (error) {
        if (error.name === 'TokenExpiredError') {
            throw new ApiError(401, 'Token has expired. Please login again.');
        }
        throw new ApiError(401, 'Invalid token. Access denied.');
    }
});

// Middleware to verify Refresh Token
export const refreshAuthenticate = asyncHandler(async (req, res, next) => {
    const incomingRefreshToken = req.cookies?.refreshToken;

    if (!incomingRefreshToken) {
        throw new ApiError(401, 'Refresh token missing. Please login again.');
    }

    try {
        // Verify token using refresh token secret
        const decoded = jwt.verify(incomingRefreshToken, process.env.REFRESH_SECRET);

        // Fetch user from database
        const user = await User.findById(decoded.userId);
        if (!user) {
            throw new ApiError(401, 'Invalid refresh token');
        }

        // Check if token exists in database (hasn't been revoked)
        const found = user.refreshTokens.some(t => t.token === incomingRefreshToken);
        if (!found) {
            throw new ApiError(401, 'Refresh token revoked or invalid');
        }

        // Attach useful info for controller
        req.user = decoded;
        req.userDoc = user;        // Full user document for updates
        req.refreshToken = incomingRefreshToken;

        next();
    } catch (err) {
        if (err.name === 'TokenExpiredError') {
            throw new ApiError(401, 'Refresh token expired. Please login again.');
        }
        throw new ApiError(401, 'Invalid refresh token');
    }
});
Then, Update Routes: src/routes/user.routes.js
import express from 'express';
import { getUsers, getUserById, registerUser, updateUser, deleteUser, loginUser, refreshAccessToken, logoutUser, getCurrentUser } from '../controllers/user.controller.js';
import { authenticate, refreshAuthenticate } from '../middlewares/auth.middleware.js';

const router = express.Router();

// Public Routes - No authentication required
router.post('/register', registerUser);
router.post('/login', loginUser);

// Refresh Token Routes - Requires valid refresh token in cookie
router.post('/refresh', refreshAuthenticate, refreshAccessToken);
router.post('/logout', authenticate, logoutUser);

// Protected Routes - Require valid Access Token
router.get('/me', authenticate, getCurrentUser);

// CRUD Routes
router.get('/', getUsers);
router.get('/:id', getUserById);
router.patch('/:id', updateUser);
router.delete('/:id', deleteUser);

export default router;
Advanced Security Features
1. Token Rotation (Already Implemented ✅)
Our refresh endpoint already implements token rotation—when a refresh token is used, we retire it and issue a new one. This prevents token reuse attacks:
- If a token is stolen and used: The attacker gets a new token, but the legitimate user's copy becomes invalid.
- On next refresh: The legitimate user is rejected and must log in again.
- Immediate detection: Users know their account was compromised instead of being silently exploited.
2. Token Limiting (Already Implemented ✅)
The trimRefreshTokens() function limits active sessions per user:
// In .env
MAX_REFRESH_TOKENS=5 // Default: 5 active devices- Older tokens are removed when the limit is exceeded.
- Prevents abuse of account sharing and session explosion.
- Works seamlessly - no user action required.
3. Logout from All Devices (Future Enhancement)
For a more user-friendly approach, add a logout endpoint that terminates all active sessions:
export const logoutAllDevices = asyncHandler(async (req, res) => {
    // This endpoint requires authentication, so req.user is available
    const userId = req.user.userId;

    // Remove ALL refresh tokens
    await User.findByIdAndUpdate(
        userId,
        { $set: { refreshTokens: [] } }
    );

    // Clear the cookie
    res.clearCookie('refreshToken', {
        httpOnly: true,
        secure: process.env.NODE_ENV === 'production',
        sameSite: 'strict',
        path: '/'
    });

    return res.status(200).json(
        new ApiResponse(200, null, 'Logged out from all devices successfully')
    );
});
Add to routes:
router.post('/logout/all', authenticate, logoutAllDevices);4. Device/Metadata Tracking (Future Enhancement)
Store additional info with refresh tokens to detect suspicious logins:
// Update user model
refreshTokens: [
    {
        token: String,
        createdAt: {type: Date, default: Date.now},
        ipAddress: String,
        userAgent: String,
        lastUsed: Date,
        deviceName: String
    }
]

// When creating token (in login)
user.refreshTokens.push({
    token: refreshToken,
    ipAddress: req.ip,
    userAgent: req.headers['user-agent'],
    deviceName: req.body.deviceName || 'Unknown Device'
});Benefit: Detect suspicious logins from unusual locations or devices.
5. Account Lockout (Future Enhancement)
Prevent brute force attacks by locking accounts after failed attempts:
// Add to user model
failedLoginAttempts: {
    type: Number,
    default: 0
},
lockUntil: Date

// In login controller
if (user.lockUntil && user.lockUntil > Date.now()) {
    throw new ApiError(429, 'Account is temporarily locked. Try again in 15 minutes.');
}

if (!isPasswordValid) {
    user.failedLoginAttempts += 1;

    if (user.failedLoginAttempts >= 5) {
        user.lockUntil = new Date(Date.now() + 15 * 60 * 1000);  // Lock for 15 minutes
    }

    await user.save();
    throw new ApiError(401, 'Invalid email or password');
}

// Reset on successful login
user.failedLoginAttempts = 0;
user.lockUntil = undefined;
await user.save();
6. Token Revocation/Blocklist (Future Enhancement)
For immediate logout/revocation (instead of waiting for expiry):
// Add to user model
revokedTokens: [
    {
        token: String,
        revokedAt: {type: Date, default: Date.now}
    }
]

// In refreshAuthenticate middleware
const isRevoked = user.revokedTokens.some(rt => rt.token === incomingRefreshToken);
if (isRevoked) {
    throw new ApiError(401, 'Token has been revoked');
}
Testing the Complete Flow
Let's test the entire authentication system with the actual endpoints.
1. Register a User
POST http://localhost:3000/users/register
Content-Type: application/json

{
  "name": "Charlie Brown",
  "email": "[email protected]",
  "password": "securePass123"
}
Response:
{
  "statusCode": 201,
  "data": {
    "name": "Charlie Brown",
    "email": "[email protected]",
    ...
  },
  "message": "User registered successfully"
}
2. Login
POST http://localhost:3000/users/login
Content-Type: application/json

{
  "email": "[email protected]",
  "password": "securePass123"
}
Response:
{
  "statusCode": 200,
  "data": {
    "user": { ... },
    "accessToken": "eyJhbGc..."
  },
  "message": "Logged In Successfully"
}
Important: The refresh token is now in your cookies as refreshToken (check browser DevTools > Application > Cookies). It's HttpOnly, so JavaScript can't access it.
3. Get Current User (Protected Route)
GET http://localhost:3000/users/me
Authorization: Bearer eyJhbGc...
Response:
{
  "statusCode": 200,
  "data": {
    "name": "Charlie Brown",
    "email": "[email protected]",
    ...
  },
  "message": "Current user fetched successfully"
}
4. Wait 15 Minutes (or reduce JWT_EXPIRY to test)
After the access token expires:
GET http://localhost:3000/users/me
Authorization: Bearer eyJhbGc...
Response:
{
  "statusCode": 401,
  "message": "Token has expired. Please login again."
}
5. Refresh the Access Token
POST http://localhost:3000/users/refreshImportant: The browser automatically sends the refresh token cookie! No need to manually include it.
Response:
{
  "statusCode": 200,
  "data": {
    "accessToken": "eyJhbGc...NEW_TOKEN..."
  },
  "message": "Access token generated"
}Note: A NEW refresh token is also set in the cookies (token rotation).
6. Use New Access Token
GET http://localhost:3000/users/me
Authorization: Bearer eyJhbGc...NEW_TOKEN...
Works again!
7. Logout
POST http://localhost:3000/users/logoutResponse:
{
  "statusCode": 200,
  "message": "Logout successful"
}
Cookie is cleared, and the refresh token is removed from the database.
8. Try to Refresh (Should Fail)
POST http://localhost:3000/users/refreshResponse:
{
  "statusCode": 401,
  "message": "Refresh token revoked or invalid"
}
Perfect! The token was removed from the database and can never be reused.
💡 Frontend Best Practice: In production, your frontend should automatically refresh tokens when they expire by detecting 401 errors and calling the
/refreshendpoint. Use Axios interceptors or similar middleware to keep users logged in seamlessly without interruption.
Summary
We have now completed a professional-grade authentication system.
- The Vault (Part 1): We secured passwords with bcrypt hashing.
- The Bouncer (Part 2): We implemented JWT Access Tokens for stateless authentication.
- The Session (Part 3): We added Refresh Tokens, HttpOnly cookies, and database tracking to balance security with user experience.
You now have the foundation that powers 90% of modern web applications. From here, you can add 2FA, email verification, or social login, but the core engine remains the same.
This concludes our Authentication Series. In the next post, we’re going to tackle File Uploads—handling images, validating file types, and storing them locally vs. the cloud.
Happy coding!