In last post, we built the refresh-token handshake so users could stay logged in without sacrificing security. Today we move on to the next real-world problem: file uploads.
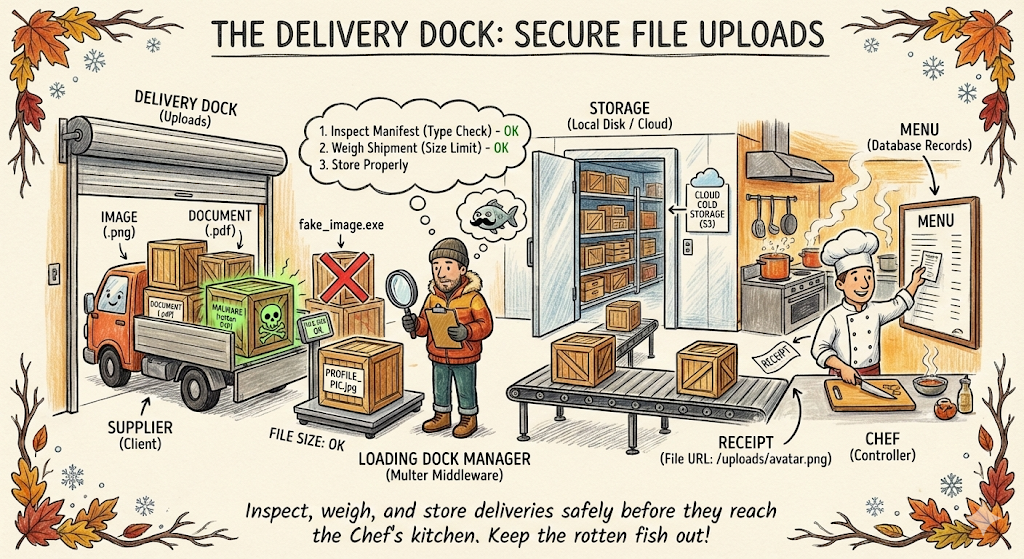
If Auth is the Bouncer at the front door, File Uploads are the Delivery Dock at the back.
While customers (users) walk in with simple JSON requests, suppliers (uploads) pull up with heavy trucks. Maybe it is a profile picture, a PDF invoice, or a short video.
If you let a supplier dump a crate of rotten fish (malware) directly onto the Chef's cutting board, the whole kitchen shuts down. You need a process to receive, inspect, and store these deliveries safely before they ever reach the menu.
Today, we are implementing File Uploads.
The Strategy: The Loading Dock
Handling files is heavier work than handling simple JSON data. If you try to pass a massive file through the same process as a tiny text order, you will clog up the kitchen.
Think of your upload middleware as the loading dock manager. Their job is to:
- Inspect the Manifest: Is this actually a box of tomatoes (image), or is it a box of rocks (malware)?
- Weigh the Shipment: Is this box too heavy for our shelves (file size limit)?
- Store it Properly: Put it in the freezer or the pantry (AWS S3, Cloudinary, or local disk), and just give the Chef a receipt (the file URL) to write on the menu.
Today, We will implement:
- Upload single images (avatars)
- Validate type and size
- Store locally for development
- Serve static files safely
Step 1: Install Upload Middleware
We will use multer, the standard Express middleware for multipart form uploads.
npm install multerStep 2: Create an Upload Config
Create a reusable upload config so all routes stay consistent.
Create file: src/config/upload.js
import multer from 'multer';
import fs from 'fs';
import path from 'path';
import { ApiError } from '../utils/ApiError.js';

const MAX_FILE_SIZE_MB = 5;
const ALLOWED_TYPES = ['image/jpeg', 'image/png', 'image/webp'];

const storage = multer.diskStorage({
  destination: function (req, file, cb) {
    // Make sure the upload directory exists
    const uploadDir = path.join(process.cwd(), 'tmp', 'uploads');
    fs.mkdirSync(uploadDir, { recursive: true });
    cb(null, uploadDir)
  },
  filename: function (req, file, cb) {
    const ext = path.extname(file.originalname).toLowerCase();
    const unique = `${Date.now()}-${Math.round(Math.random() * 1E9)}`;
    cb(null, `${unique}${ext}`)
  }
})

const fileFilter = function (req, file, cb) {
    if(!ALLOWED_TYPES.includes(file.mimetype)){
        return cb(new ApiError(400, "Only JPEG, PNG and WEBP images are allowed"));
    }
    cb(null, true);
};

export const uploadSingleImage = multer({
    storage,
    fileFilter,
    limits: {fileSize: MAX_FILE_SIZE_MB * 1024 * 1024}
 }).single('image');
⚠️ The "Fake ID" Problem
In the code above, we check file.mimetype. This is like checking a driver's license at the door. However, headers can be spoofed. A hacker can send a malicious executable (virus.exe) but tell the browser to label it as image/png.
How do we fix this?
To be 100% sure, we check the Magic Numbers. These are the first few bytes of the file's binary data (e.g., a JPEG always starts with FF D8 FF).
For this tutorial, we will stick to the basic extension check to keep things simple. However, in a high-security environment, you would use a library like file-type to inspect the file buffer before saving it, or use a malware scanner on your S3 bucket.
Step 3: Serve Uploaded Files
Expose the uploads folder so the frontend can view images.
Update: src/app.js
import path from 'path';
// ... existing imports

const app = express();

app.use(express.json());

// Serve uploaded files
app.use('/uploads', express.static(path.join(process.cwd(), 'tmp', 'uploads')));

// ... routes
Why do we need this step?
When you use multer to save a file, it lands in a folder on your server's hard drive (e.g., C:/project/uploads).
The internet cannot see your hard drive. If a browser tries to visit localhost:3000/uploads/image.png, Express will usually say "Cannot GET," because it doesn't know that route exists.
express.static is the bridge. It tells Express: "If anyone asks for a file inside the /uploads URL path, go look in the uploads folder on the hard drive and send that file back."
Note: In production, you usually serve files via a CDN or object storage, not directly from your app server.
Step 4: Add an Upload Route
Create a controller to handle file upload and return the file URL.
Update: src/controllers/user.controller.js
export const uploadAvatar = asyncHandler(async (req, res) => {
    if (!req.file) {
        throw new ApiError(400, 'No image uploaded');
    }

    const fileUrl = `/uploads/${req.file.filename}`;

    return res.status(200).json(
        new ApiResponse(200, { url: fileUrl }, 'Avatar uploaded successfully')
    );
});
Now wire the route.
Update: src/routes/user.routes.js
import { uploadSingleImage } from '../config/upload.js';
import { uploadAvatar } from '../controllers/user.controller.js';

// Protected route: requires access token
router.post('/avatar', authenticate, uploadSingleImage, uploadAvatar);
Step 5: Handling Upload Errors
Multer throws errors differently. Normalize them in your error handler.
Update: src/middlewares/error.middleware.js
import multer from 'multer';

export const errorHandler = (err, req, res, next) => {
    if (err instanceof multer.MulterError) {
        if (err.code === 'LIMIT_FILE_SIZE') {
            return res.status(400).json({
                statusCode: 400,
                message: 'File too large. Max 2MB allowed.'
            });
        }
    }

    // ... existing error logic
};
Testing the Upload Flow
1. Upload Avatar
POST http://localhost:3000/users/avatar
Authorization: Bearer <ACCESS_TOKEN>
Content-Type: multipart/form-data

Form-Data:
image: <select image file>
Response:
{
  "statusCode": 200,
  "data": {
    "url": "/uploads/1708250000000-123456789.png"
  },
  "message": "Avatar uploaded successfully"
}
2. View File
Open in browser:
http://localhost:3000/uploads/1708250000000-123456789.pngSecurity Corner 🔒
If Auth is the Bouncer, the Upload handler is the Quality Control Inspector. Here is how to keep the Loading Dock safe:
- Prevent Code Execution (The Golden Rule):
Imagine a user uploads a file named
hack.jsorexploit.php. If they can request that URL and the server executes it, they own your server.
- Fix: Ensure your uploads directory does not have "execute" permissions.
- Fix: Always serve uploads with the
X-Content-Type-Options: nosniffheader (Helmet.js does this automatically) so browsers don't try to "guess" that a text file is actually a script.
- Magic Numbers over Extensions:
As mentioned in Step 2, don't trust the file extension (
.jpg). Trust the file signature (Magic Numbers). Use libraries likefile-typeto verify the content matches the extension. - Sanitize Filenames: Never use the user's filename.
- Bad:
avatar.png(Overwrites others) - Bad:
../../etc/passwd(Directory Traversal attack) - Good: uuid-v4.png (Randomized, safe) —→ We did this!
- The "Zip Bomb":
Sometimes users upload massive compressed files that expand to fill your entire hard drive. This is why our
MAX_FILE_SIZE_MBlimit in Step 2 is critical.
Production Upgrade Path (Cloud Storage)
Local storage is fine for development, but production needs durability and scale.
Common pattern:
- Upload to S3 or Cloudinary
- Store the public URL in the DB
- Serve from a CDN
Pseudo flow:
Client -> API -> Cloud Storage -> Return URLWe will cover cloud uploads in the next post.
DIY Challenge - Organize the Pantry
Instead of dumping all files into one big uploads/ folder, try to make the destination dynamic.
The Task: Modify the multer storage configuration so that:
- Images go to
uploads/images/ - PDFs (if you allowed them) go to
uploads/docs/ - Everything else goes to
uploads/others/
This reinforces the logic in Step 2 without needing a database.
Summary
You now have a safe, structured upload pipeline:
- Multer handles multipart uploads
- File type and size validation keeps you safe
- Uploaded files are exposed via a static route
- Errors are normalized for clean API responses
Next up, we will attach these uploads to real user records and build a full profile system.
Stay tuned and code safe!