In the last post, we built a local file upload system—our Loading Dock. Files came in, got inspected, and were stored on the server's hard drive.
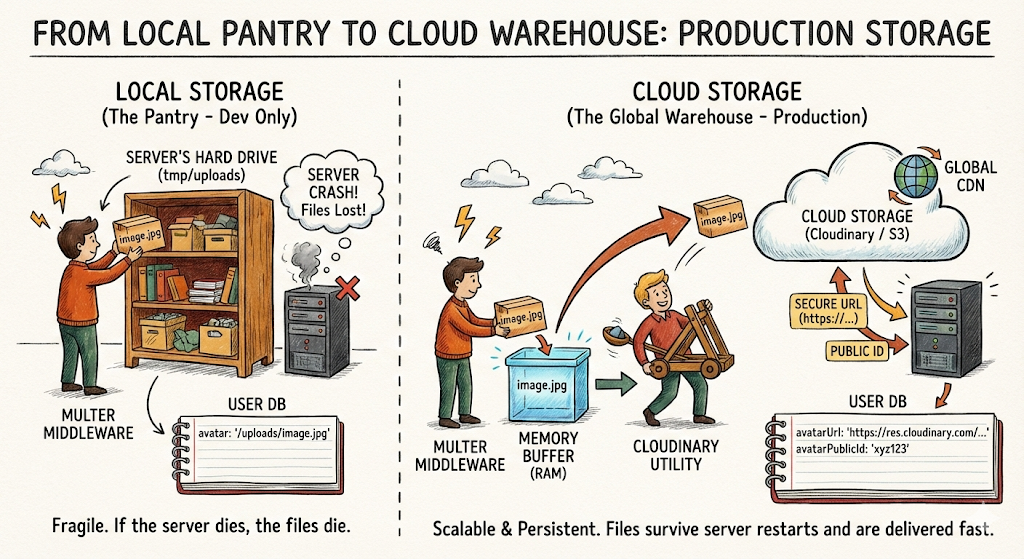
That works great for development. But in production, your server might restart, crash, or scale horizontally (multiple servers). If you lose the machine, you lose the files.
Today, we upgrade from the Local Pantry to the Cloud Warehouse.
Think of Cloudinary (or AWS S3) as an off-site warehouse with unlimited shelves, backup generators, and global delivery trucks (CDN). You send the shipment there, they give you a receipt (URL), and you just store that receipt in your database.
We will also link these uploads to actual user profiles, so each user has their own avatar that persists across sessions.
What We're Building Today
- Cloud Storage: Migrating from local disk storage to Cloudinary.
- Profile Schema: Expanding the User model to support persistent avatars.
- Profile Endpoints: Let users view and update their profile
- Atomic Updates: Ensuring old files are deleted when new ones are uploaded.
- Security Hardening: Protecting the upload pipeline from "Orphaned files" and abuse.
Step 1: Set Up Cloudinary
We will use Cloudinary for this tutorial, but the concepts apply to any cloud storage provider.
1.1 Install Dependencies
npm install cloudinary1.2 Get Cloudinary Credentials
- Sign up at cloudinary.com
- Go to Dashboard → Copy your:
- Cloud Name
- API Key
- API Secret
1.3 Add to Environment Variables
Update: .env
# Cloudinary Configuration
CLOUDINARY_CLOUD_NAME=your_cloud_name
CLOUDINARY_API_KEY=your_api_key
CLOUDINARY_API_SECRET=your_api_secret
Security Note: Never commit
.envto Git. Always add it to.gitignore.
Step 2: Configure Cloudinary
Create a centralized Cloudinary configuration.
Create file: src/config/cloudinary.js
import { v2 as cloudinary } from 'cloudinary';

cloudinary.config({
    cloud_name: process.env.CLOUDINARY_CLOUD_NAME,
    api_key: process.env.CLOUDINARY_API_KEY,
    api_secret: process.env.CLOUDINARY_API_SECRET
});

export default cloudinary;
Step 3: Update Upload Configuration
We'll keep multer for parsing multipart data, but instead of saving to disk, we'll use multer.memoryStorage() to hold the file in RAM temporarily, then stream it to Cloudinary.
Update: src/config/upload.js
import multer from 'multer';
import { ApiError } from '../utils/ApiError.js';

const MAX_FILE_SIZE_MB = 2;
const ALLOWED_TYPES = ['image/jpeg', 'image/png', 'image/webp'];

// Use memory storage instead of disk
const storage = multer.memoryStorage();

const fileFilter = function (req, file, cb) {
    if(!ALLOWED_TYPES.includes(file.mimetype)){
        return cb(new ApiError(400, "Only JPEG, PNG and WEBP images are allowed"));
    }
    cb(null, true);
};

export const uploadSingleImage = multer({
    storage,
    fileFilter,
    limits: {fileSize: MAX_FILE_SIZE_MB * 1024 * 1024}
}).single('image');
What changed?
multer.diskStorage()→multer.memoryStorage()- Files now sit in
req.file.buffer(RAM) instead of being written to disk - We'll push that buffer to Cloudinary
Step 4: Create Upload Utility
Create a reusable function to upload buffers to Cloudinary.
Create file: src/utils/cloudinary.js
import cloudinary from '../config/cloudinary.js';
import { Readable } from 'stream';

export const uploadToCloudinary = (buffer, folder = 'avatars') => {
    return new Promise((resolve, reject) => {
        const uploadStream = cloudinary.uploader.upload_stream(
            {
                folder: folder,
                resource_type: 'image',
                transformation: [
                    { width: 500, height: 500, crop: 'limit' },
                    { quality: 'auto' },
                    { fetch_format: 'auto' }
                ]
            },
            (error, result) => {
                if (error) return reject(error);
                resolve(result);
            }
        );

        // Convert buffer to stream and pipe to Cloudinary
        const readableStream = Readable.from(buffer);
        readableStream.pipe(uploadStream);
    });
};

export const deleteFromCloudinary = async (publicId) => {
    try {
        const result = await cloudinary.uploader.destroy(publicId);
        return result;
    } catch (error) {
        console.error('Cloudinary deletion error:', error);
        throw error;
    }
};
Why transformations?
width/height: Prevent 50MB profile picturesquality: auto: Let Cloudinary optimize file sizefetch_format: auto: Serve WebP to browsers that support it
Step 5: Update User Model
To manage these assets, we need two things in our database: the URL (to show the user) and the Public ID (to let us delete or modify the file later). Add an avatarUrl and avatarPublicId to the User schema.
Update: src/models/user.model.js
const userSchema = new Schema(
    {
        // ... existing fields
        avatarUrl: {
            type: String,
            default: null,
        },
        avatarPublicId: {
            type: String,
            default: null,
        }
    },{ timestamps: true }
);

// ... existing pre-save hook for password hashing ...

// ... existing methods like isPasswordCorrect, generateAccessToken ...

// Add a toJSON method to hide sensitive fields when sending user data to the client
// This method is called automatically whenever res.json(user) is sent.
userSchema.methods.toJSON = function () {
    const user = this.toObject();

    delete user.password;
    delete user.refreshToken;
    delete user.avatarPublicId; // Hide this so clients can't manipulate it
    delete user.__v;            // Remove internal mongoose version key

    return user;
};
Why put toJSON in the User Schema?
When you call res.json(user), Express internally calls user.toJSON(). By defining this method, we can control exactly what gets sent to the client. This is a crucial security measure to prevent sensitive information (like passwords, refresh tokens, or internal IDs) from being exposed in API responses.
By adding it to the model, you don't have to manually delete password or avatarPublicId in every single controller (login, register, updateProfile, etc.). It centralizes the logic for sanitizing user data in one place.
Step 6: Update Upload Controller
Now we upload to Cloudinary and save the URL to the user's profile.
The biggest mistake in file uploads is leaving "Zombie Files" — images that exist in the cloud but aren't linked to any user. We handle this by deleting the old avatar before saving the new one.
Update: src/controllers/user.controller.js
import { uploadToCloudinary, deleteFromCloudinary } from '../utils/cloudinary.js';
import User from '../models/user.model.js';

export const uploadAvatar = asyncHandler(async (req, res) => {
    if (!req.file) {
        throw new ApiError(400, 'No image uploaded');
    }

    // If user already has an avatar, delete it from Cloudinary
    const user = await User.findById(req.user._id);
    if (user.avatarPublicId) {
        await deleteFromCloudinary(user.avatarPublicId);
    }

    // Upload new avatar to Cloudinary
    const result = await uploadToCloudinary(req.file.buffer, 'avatars');

    // Update user record
    user.avatarUrl = result.secure_url;
    user.avatarPublicId = result.public_id;
    await user.save();

    // RETURNING FULL USER OBJECT instead of just the URL
    // The .toJSON() method will automatically remove the password/publicId
    return res.status(200).json(
        new ApiResponse(200, user, 'Avatar updated successfully')
    );
});
What's happening?
- Check if user already has an avatar → delete old one
- Upload new file to Cloudinary
- Save the URL and public_id to the database
- Return the new URL to the client
Security Concern: Database writes can fail after uploading to Cloudinary, leaving orphaned files. In production, consider wrapping the upload and DB update in a transaction-like pattern to ensure consistency. Covered in the Security section below.
Step 7: Build Profile Endpoints
Let users view and update their profile.
Update: src/controllers/user.controller.js
// ... existing imports and functions

// 1. Reuse your existing getCurrentUser logic
// If you haven't defined this yet, here is the standard implementation:
export const getCurrentUser = asyncHandler(async (req, res) => {
    // req.user is already injected by the auth middleware
    // We fetch it again to ensure we have the latest data
    const user = await User.findById(req.user._id).select('-password -refreshToken');

    if (!user) {
        throw new ApiError(404, 'User not found');
    }

    return res.status(200).json(
        new ApiResponse(200, user, 'User fetched successfully')
    );
});

export const updateProfile = asyncHandler(async (req, res) => {
    const { username, email } = req.body;

    const user = await User.findById(req.user._id);
    if (!user) {
        throw new ApiError(404, 'User not found');
    }

    // Update only provided fields
    if (username) user.username = username;
    if (email) user.email = email;

    await user.save();

    return res.status(200).json(
        new ApiResponse(200, {
            username: user.username,
            email: user.email,
            avatarUrl: user.avatarUrl
        }, 'Profile updated successfully')
    );
});

export const deleteAvatar = asyncHandler(async (req, res) => {
    const user = await User.findById(req.user._id);

    if (!user.avatarPublicId) {
        throw new ApiError(400, 'No avatar to delete');
    }

    // Delete from Cloudinary
    await deleteFromCloudinary(user.avatarPublicId);

    // Clear from database
    user.avatarUrl = null;
    user.avatarPublicId = null;
    await user.save();

    return res.status(200).json(
        new ApiResponse(200, null, 'Avatar deleted successfully')
    );
});
Step 8: Wire Up Routes
Update: src/routes/user.routes.js
// ... existing imports and router setup

// Protected routes
router.post('/logout', authenticate, logoutUser);
router.get('/profile', authenticate, getCurrentUser);
router.patch('/profile', authenticate, updateProfile);
router.post('/avatar', authenticate, uploadSingleImage, uploadAvatar);
router.delete('/avatar', authenticate, deleteAvatar);

export default router;
Step 9: Clean Up Local Uploads
Since we're using Cloudinary now, we can remove the express.static middleware for local uploads.
Update: src/app.js
// Remove or comment out:
// app.use('/uploads', express.static(path.join(process.cwd(), 'tmp', 'uploads')));
You can also delete the tmp/uploads/ folder if you no longer need it.
Testing the Full Profile Flow
1. Get Profile
GET http://localhost:3000/users/profile
Authorization: Bearer <ACCESS_TOKEN>
Response:
{
  "statusCode": 200,
  "data": {
    "_id": "507f1f77bcf86cd799439011",
    "username": "johndoe",
    "email": "[email protected]",
    "avatarUrl": null,
    "createdAt": "2026-02-19T10:00:00.000Z",
    "updatedAt": "2026-02-19T10:00:00.000Z"
  },
  "message": "Profile fetched successfully"
}
2. Upload Avatar
POST http://localhost:3000/users/avatar
Authorization: Bearer <ACCESS_TOKEN>
Content-Type: multipart/form-data

Form-Data:
image: <select image file>
Response:
{
  "statusCode": 200,
  "data": {
    "avatarUrl": "https://res.cloudinary.com/demo/image/upload/v1234567890/avatars/abc123.jpg"
  },
  "message": "Avatar uploaded successfully"
}
3. Update Profile
PATCH http://localhost:3000/users/profile
Authorization: Bearer <ACCESS_TOKEN>
Content-Type: application/json

{
  "username": "johndoe_updated"
}
4. Delete Avatar
DELETE http://localhost:3000/users/avatar
Authorization: Bearer <ACCESS_TOKEN>
Security Corner 🔒
-
Rate Limiting on Uploads: Without rate limits, users could spam your upload endpoint and rack up Cloudinary bills. We will cover rate limiting in a future post.
-
Orphaned Files: If your database write fails after uploading to Cloudinary, you'll have orphaned files in the cloud.
Solution: Wrap in a transaction-like pattern:
let cloudinaryResult; try { cloudinaryResult = await uploadToCloudinary(req.file.buffer); user.avatarUrl = cloudinaryResult.secure_url; user.avatarPublicId = cloudinaryResult.public_id; await user.save(); } catch (error) { // Rollback: delete from Cloudinary if DB save failed if (cloudinaryResult?.public_id) { await deleteFromCloudinary(cloudinaryResult.public_id); } throw error; } -
Public ID Leakage: Don't expose
avatarPublicIdto clients. Keep it backend-only. Only sendavatarUrl. Already handled by thetoJSONmethod in the User model.
DIY Challenge - Multiple File Types
Right now, we only handle avatars. Extend the system to support:
- Cover Photos: Larger banners (1200x400)
- Document Uploads: PDFs for user portfolios
Hints:
- Add
coverPhotoUrlandcoverPhotoPublicIdto User model - Create separate upload configs with different limits
- Use Cloudinary folders:
avatars/,covers/,documents/
Bonus: Create an admin endpoint that lists all uploaded files and their sizes (for auditing storage usage).
Summary of Our Backend Journey
- Authentication: We built the doors (JWT/Refresh Tokens).
- Local Storage: We built the temporary workbench (Multer/Disk).
- Production Assets: We’ve now built the permanent vault (Cloudinary/MongoDB).
Your application can now cleanly handle server restarts without losing data, and robustly power full user profile management without breaking a sweat.
Next Steps: Hardening the Core
Now that our features are complete, we need to protect them from the "Wild West" of the internet. In the next post, we will cover:
- Express Security: Using
Helmet.jsto hide tech stacks. - Injection Protection: Sanitizing inputs to prevent NoSQL attacks.
- Advanced Logging: Moving from
console.logto Winston for production monitoring.
Until then, keep shipping!