In our last post, we connected Users with their Posts using MongoDB References. But we ended on a chilling realization: right now, anyone who knows an authorId can create or delete a post on behalf of that user.
There's no gatekeeper. No verification. No trust.
Welcome to the most critical chapter in backend development: Authentication. And it all starts with one golden rule.
Security doesn't begin when someone logs in. It begins the moment you store their password.
Before we talk about JWTs or tokens or sessions, we need to talk about how we store user credentials. Because if you get this part wrong, nothing else matters. A hacker with access to your database shouldn't be able to read user passwords. Ever.
This is Part 1 of our Authentication Series. Today, we're focusing exclusively on User Registration and Password Security. We'll cover login and tokens in Part 2.
Let's build the foundation right.
The Golden Rule: Never Store Plain-Text Passwords
Let me paint a nightmare scenario.
You're running a successful app with 10,000 users. One night, a hacker exploits a vulnerability and downloads your entire database. If your passwords are stored as plain text, the hacker now has:
- Every user's email
- Every user's password
- The ability to try those same credentials on Gmail, Facebook, banking sites, etc.
Why? Because most people reuse passwords.
If you look at our createUser logic from earlier chapters, we were doing something horrific:
const newUser = await User.create({
    name,
    email,
    password  // <-- We saved "hunter2" directly into the database!
});
If a hacker steals your database, they can now log into your user's email, their social media, maybe even their bank. Your one security failure becomes everyone's security failure.
The Solution: Hashing
Instead of storing "hunter2", we store something like this:
$2a$10$vI8aWBnxQJZ9Nv8J8j0fD8xK2aeImiTXuWVxfM37uY4JANjQ.Y8kJ
That's a hashed password. Even if a hacker steals your database, they see gibberish. They can't "decode" it back to the original password because hashing is a one-way street.
Hashing vs. Encryption: Understanding the Difference
This is where many developers get confused. Hashing and encryption sound similar, but they're fundamentally different.
Encryption: A Two-Way Street
- You encrypt data with a key.
- You can decrypt it back to the original with the same key.
- Example: HTTPS encrypts your messages so hackers on public Wi-Fi can't read them. But the server decrypts them to understand your request.
Hashing: A One-Way Street
- You hash data, and you cannot reverse it.
- It's like turning a potato into mashed potatoes. Once it's mashed, you can't un-mash it back into a whole potato.
- Use case: Passwords. You never need to "decrypt" a password. You only need to verify it.
When a user logs in, you don't decrypt their stored password. Instead, you:
- Hash the password they just entered.
- Compare the new hash to the stored hash.
- If they match, the password is correct.
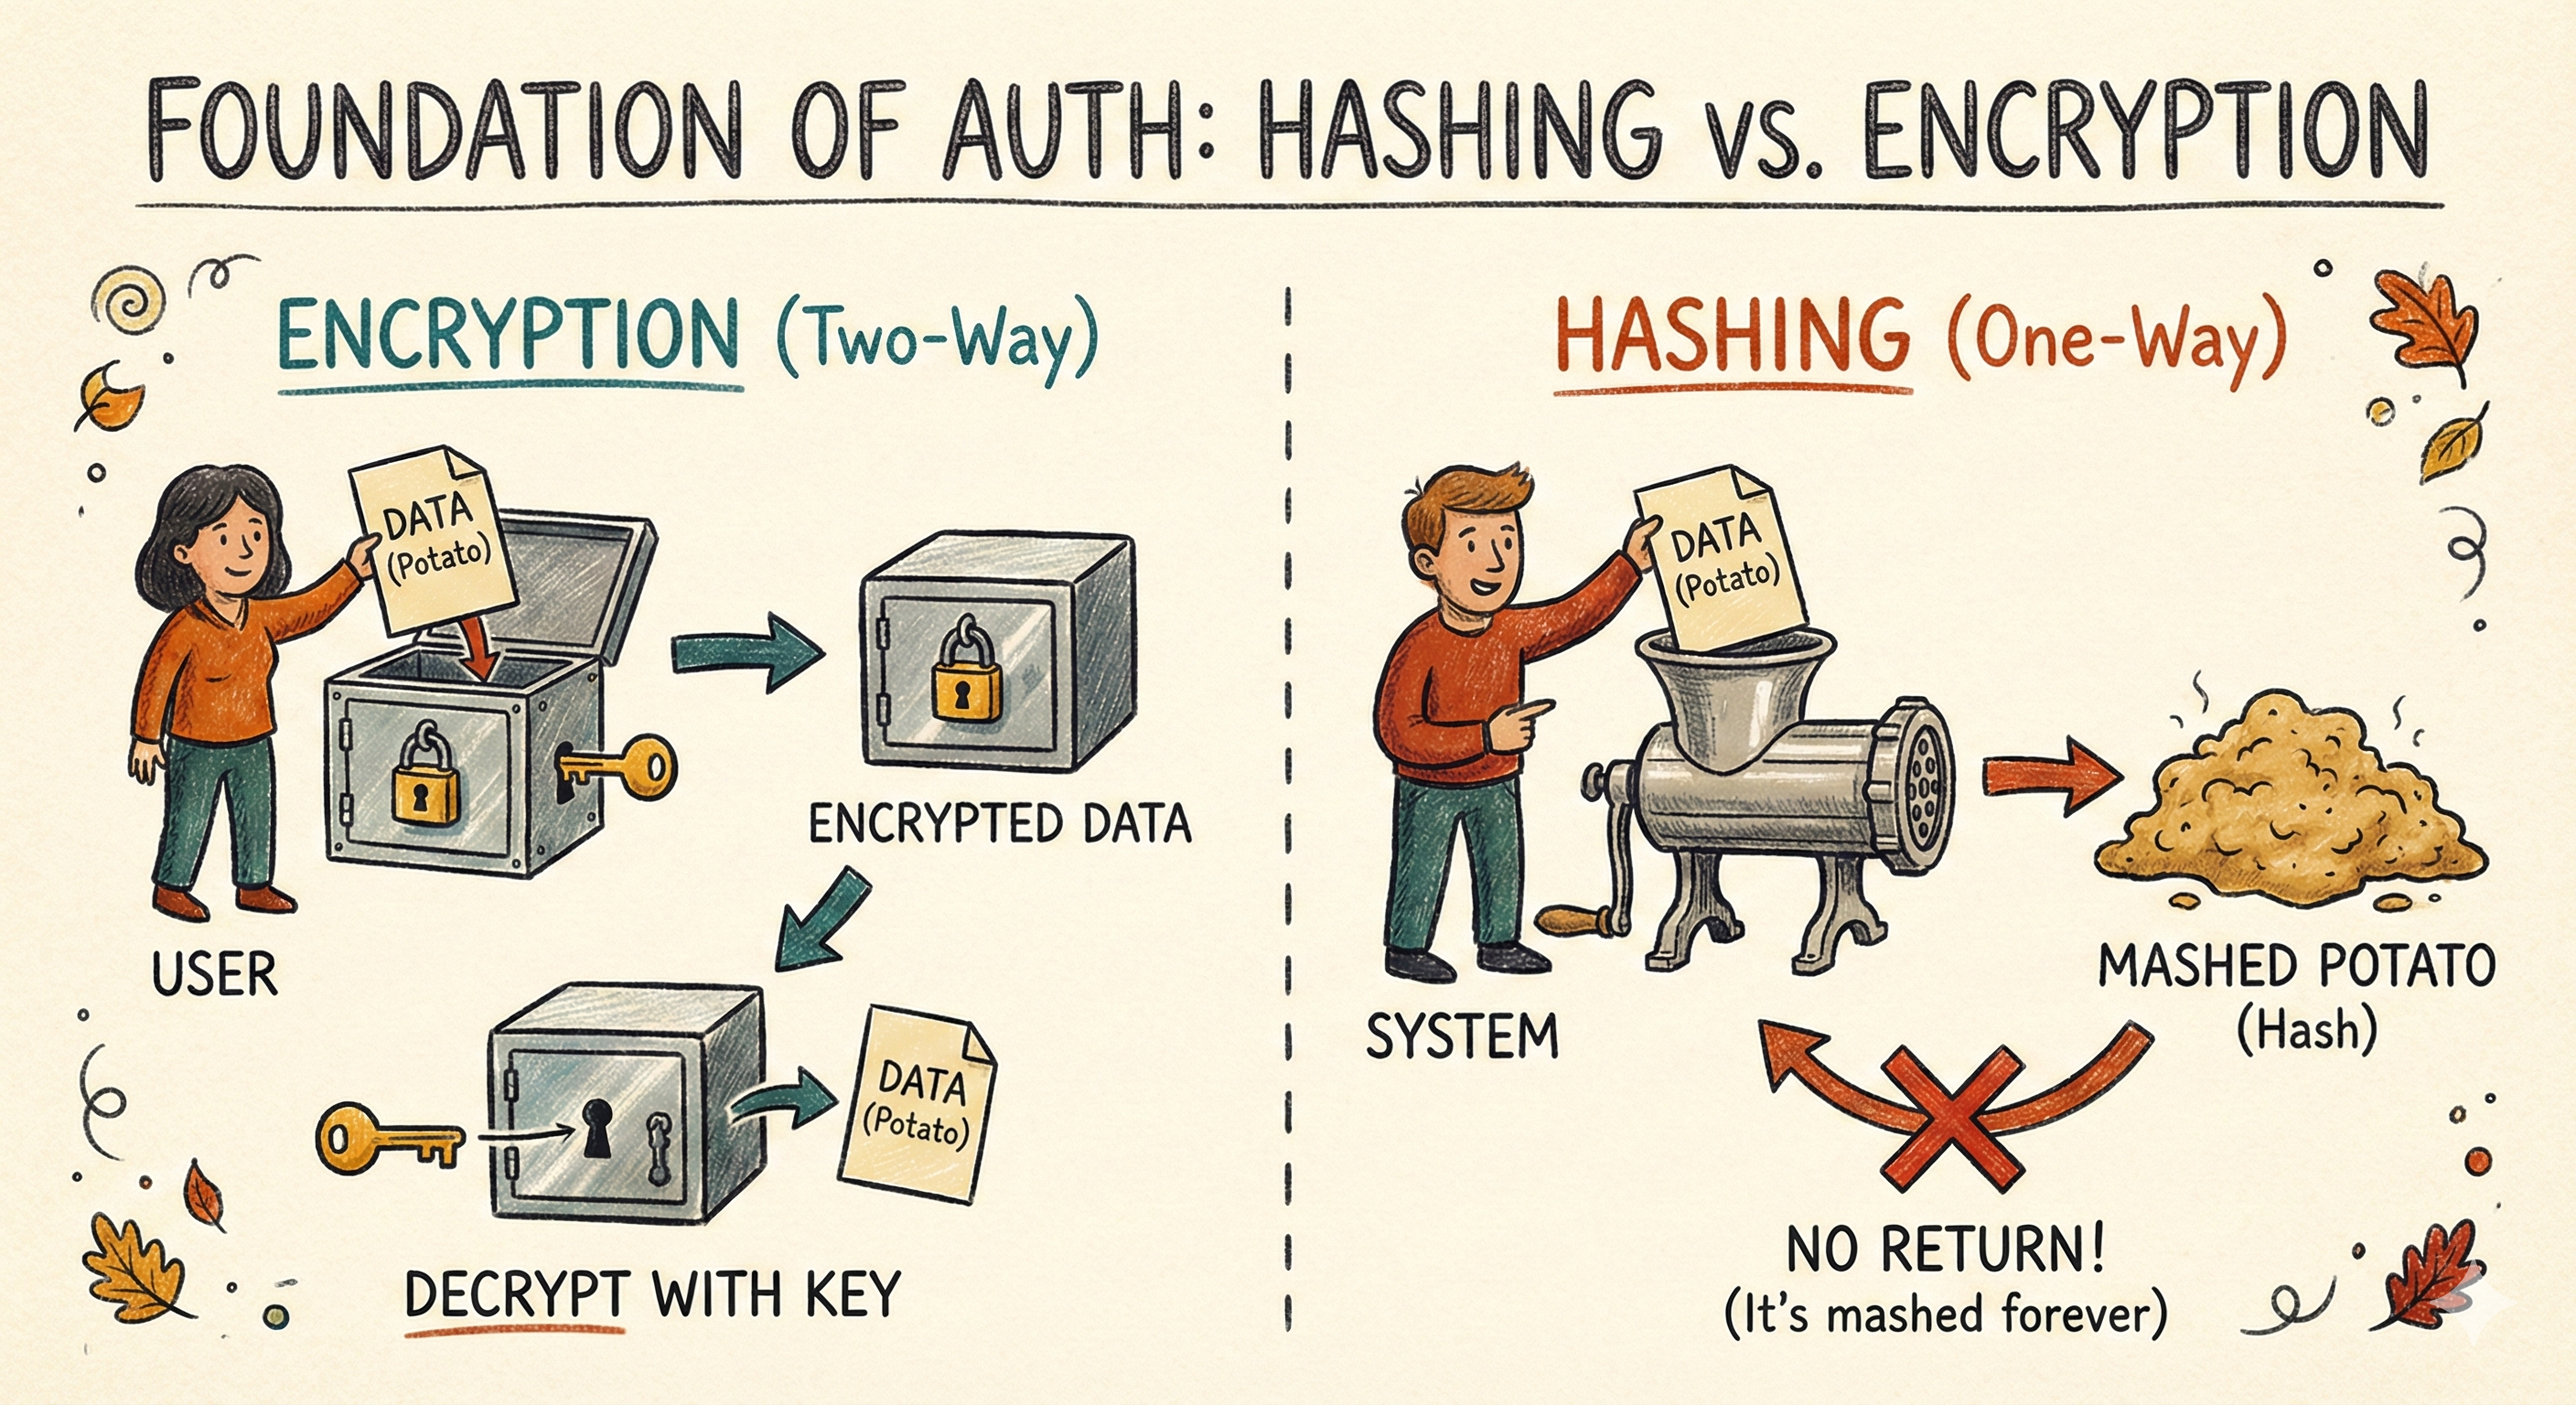
🥔 Analogy: Hashing is like turning a potato into mashed potatoes. You can't reverse it. But if someone claims they brought the same potato, you can mash their potato and check if it matches your mashed potato.
The Tool: bcryptjs and Salting
We'll use bcryptjs (a JavaScript implementation of bcrypt) to hash passwords. It's battle-tested, widely used, and specifically designed for passwords.
Why Not Just Use SHA-256 or MD5?
Those are fast hashing algorithms. Too fast. A hacker with a modern GPU can try billions of SHA-256 hashes per second, using "rainbow tables" (pre-computed hash dictionaries) to crack passwords in minutes.
bcrypt is intentionally slow. It uses a "cost factor" that makes each hash take time. This protects against brute-force attacks.
Salting: The Secret Ingredient
Even bcrypt alone isn't enough. Here's why:
If two users have the same password ("password123"), they would have the same hash. A hacker could spot the pattern:
user1: $2b$10$abc123...
user2: $2b$10$abc123...  ← Same hash. Must be the same password.
Salting solves this. A salt is a random string added to the password before hashing. Even if two users have the same password, their salts (and thus their hashes) will be different.
user1 password: "password123" + "Jk8*F2!x" → hash1
user2 password: "password123" + "random_salt_abc" → hash2
Now the hashes are completely different. bcrypt generates a unique salt for every password automatically. You don't have to manage it manually.
The Implementation
Now that we understand the "why," let's build the "how."
Step 1: Install bcryptjs
Run this in your terminal:
npm install bcryptjs(Note: We use bcryptjs as it is pure JavaScript and won't cause compiling issues on Windows/Mac).
Step 2: The Model (Where the Magic Happens)
Here's where Mongoose becomes powerful. We'll use a Mongoose pre-save hook—middleware that runs automatically before a document is saved to the database. Instead of hashing the password in our Controller before saving the user (which we might forget if we create users from multiple places), we put the logic inside the Model.
Update: src/models/user.model.js
import mongoose from 'mongoose';
import bcrypt from 'bcryptjs';

const userSchema = new mongoose.Schema({
    name: {
        type: String,
        required: true
    },
    email: {
        type: String,
        required: true,
        unique: true,
        lowercase: true,
        trim: true
    },
    password:{
        type: String,
        required: true,
        minLength: 8 // Enforce minimum password length
    }
}, {timestamps: true});

// RUNS BEFORE SAVING
userSchema.pre('save', async function(next) {
    // IMPORTANT: If they are just updating their email or name,
    // we don't want to re-hash the already hashed password!
    if (!this.isModified('password')) return next();

    // Generate a salt with cost factor of 10
    const salt = await bcrypt.genSalt(10);

    // Hash the password using the salt
    this.password = await bcrypt.hash(this.password, salt);

    next();
});

const User = mongoose.model('User', userSchema);
export default User;
What's Happening Here?
userSchema.pre('save', ...): This tells Mongoose, "Before you save a user to the database, run this function first." Notice thefunction(next)instead of an arrow function() =>? We need access tothis, which refers to the current document being saved. Arrow functions mess up thethiscontext.if (!this.isModified('password')): If the user is updating their email or name (not their password), don't re-hash the password. This prevents double-hashing.bcrypt.genSalt(10): Generate a random salt. The number10is the "cost factor." Higher = more secure but slower. 10 is the sweet spot.bcrypt.hash(this.password, salt): Hash the plain-text password with the salt.this.password = ...: Replace the plain-text password with the hashed version before saving.
🔐 Security Note: The plain text password is never stored. It's immediately replaced with the hash before the database write happens.
Step 3: Building the Registration Service
Because our model handles the hashing, our controllers stay beautifully simple. Let's create a robust User Registration Controller.
import { asyncHandler } from '../utils/asyncHandler.js';
import { ApiResponse } from '../utils/ApiResponse.js';
import { ApiError } from '../utils/ApiError.js';
import User from '../models/user.model.js';

export const registerUser = asyncHandler(async (req, res) => {
    const { name, email, password } = req.body;

    // Validation
    if (!name || !email || !password) {
        throw new ApiError(400, 'All fields are required');
    }

    if (password.length < 8) {
        throw new ApiError(400, 'Password must be at least 8 characters long');
    }

    // Check if user already exists
    const existingUser = await User.findOne({ email });

    if (existingUser) {
        throw new ApiError(409, 'User with this email already exists');
    }

    // Create new user (password will be hashed automatically by pre-save hook)
    const user = await User.create({
        name,
        email,
        password
    });

    // Remove sensitive fields before responding
    const userResponse = user.toObject();
    delete userResponse.password;

    return res.status(201).json(
        new ApiResponse(201, userResponse, 'User registered successfully')
    );
});
Breaking It Down:
- Validation: We check that all fields are present and meet minimum length requirements.
- Check for Existing User: Before creating a new user, we check if someone with that email already exists.
- Create User: We call
User.create(), which triggers thepre('save')hook we defined earlier. The password is hashed automatically. - Security Response: Before sending the response, we delete the password field from the user object via
delete userResponse.password. Even though it's hashed, it's a security best practice to never send it back to the client.
Summary
You've just built the bedrock of your application's security.
To recap, here is what we accomplished:
- The Vault is Locked: We replaced plain-text passwords with bcrypt hashes, ensuring that even if the database is stolen, the user's secrets remain safe.
- The Guard is Automated: We used Mongoose pre-save hooks to handle security automatically, so you can't "forget" to hash a password.
- The Protocol is Clean: We built a registration flow that validates data, creates users, and sanitizes the response.
But we have a problem.
We have successfully secured the "filing cabinet" where the user data lives. But the "front door" of our API is still wide open.
Right now, a user can register, but they can't actually do anything. They have an identity, but no way to prove it. They are like a guest with a membership card, but no way to swipe it at the door.
In Part 2: The Login System, we will hire the bouncer.
We will learn how to:
- Verify Credentials: Compare a login password against the stored hash.
- Issue the Badge: Generate a JSON Web Token (JWT) that proves the user's identity.
- Lock the Doors: Protect our routes so only users with a valid badge can enter.
Security isn't just about building a wall; it's about building a smart gate. See you in the next post.
Happy coding!